If your onigiri falls apart or the nori (dried seaweed) turns soggy, you’re not alone. Small details in how you shape and wrap the rice make a big difference.
In this guide, you’ll learn three simple ways to wrap onigiri, how to keep nori crisp, and how to shape onigiri without crushing the rice.

Quick Answer: Best Way to Wrap Onigiri
The best way to wrap onigiri depends on when you plan to eat it:
Eat right away: Wrap nori just before serving for the best crisp texture.
Pack for later: Keep nori separate and add it just before eating.
Wrap ahead: Wrap early if you prefer soft nori, which is common for homemade onigiri.
Tip: Japanese convenience stores use special packaging to keep nori separate from the rice until opening, which helps it stay crisp.
Jump to:
- Quick Answer: Best Way to Wrap Onigiri
- What You Need to Wrap Onigiri
- How to Shape Onigiri by Hand (Step-by-Step)
- How to Wrap Onigiri in Nori
- How to Wrap Onigiri with Plastic Wrap
- Onigiri Without Nori
- How to Make Onigiri Without Nori
- How to Keep Nori from Getting Soggy
- How to Store Onigiri
- Common Mistakes When Wrapping Onigiri
- FAQs
- More Onigiri Recipes and Ingredient Guides
What You Need to Wrap Onigiri
You don’t need any special equipment to make onigiri. Just a few simple ingredients and tools.
Warm Cooked Japanese Rice
Use Japanese short-grain rice, which has the natural stickiness needed to hold its shape.
The rice should be warm, not steaming hot or cold. Too hot will burn your hands, while rice that is too cold becomes dry and harder to shape.
Nori Sheets
Roasted nori (dried seaweed) works best for wrapping onigiri.
You can use full sheets cut into strips or pre-cut nori made specifically for onigiri.
Tip: Place the rough side of the nori against the rice and the shiny side facing out.
Salted Hands or Plastic Wrap
There are two common ways to shape onigiri.
Salted hands (traditional): Lightly wet and salt your hands before shaping.
Plastic wrap (easier): Use plastic wrap to shape the rice without touching it directly.
Use gentle pressure so the rice holds together without becoming dense or compact.
Tip: Don’t skip the salt. It lightly seasons the rice and helps it keep better, especially if you’re not eating the onigiri right away.
Optional: Onigiri Mold
An onigiri mold helps create uniform shapes quickly.
It’s useful but not necessary. Many people in Japan still shape onigiri by hand.
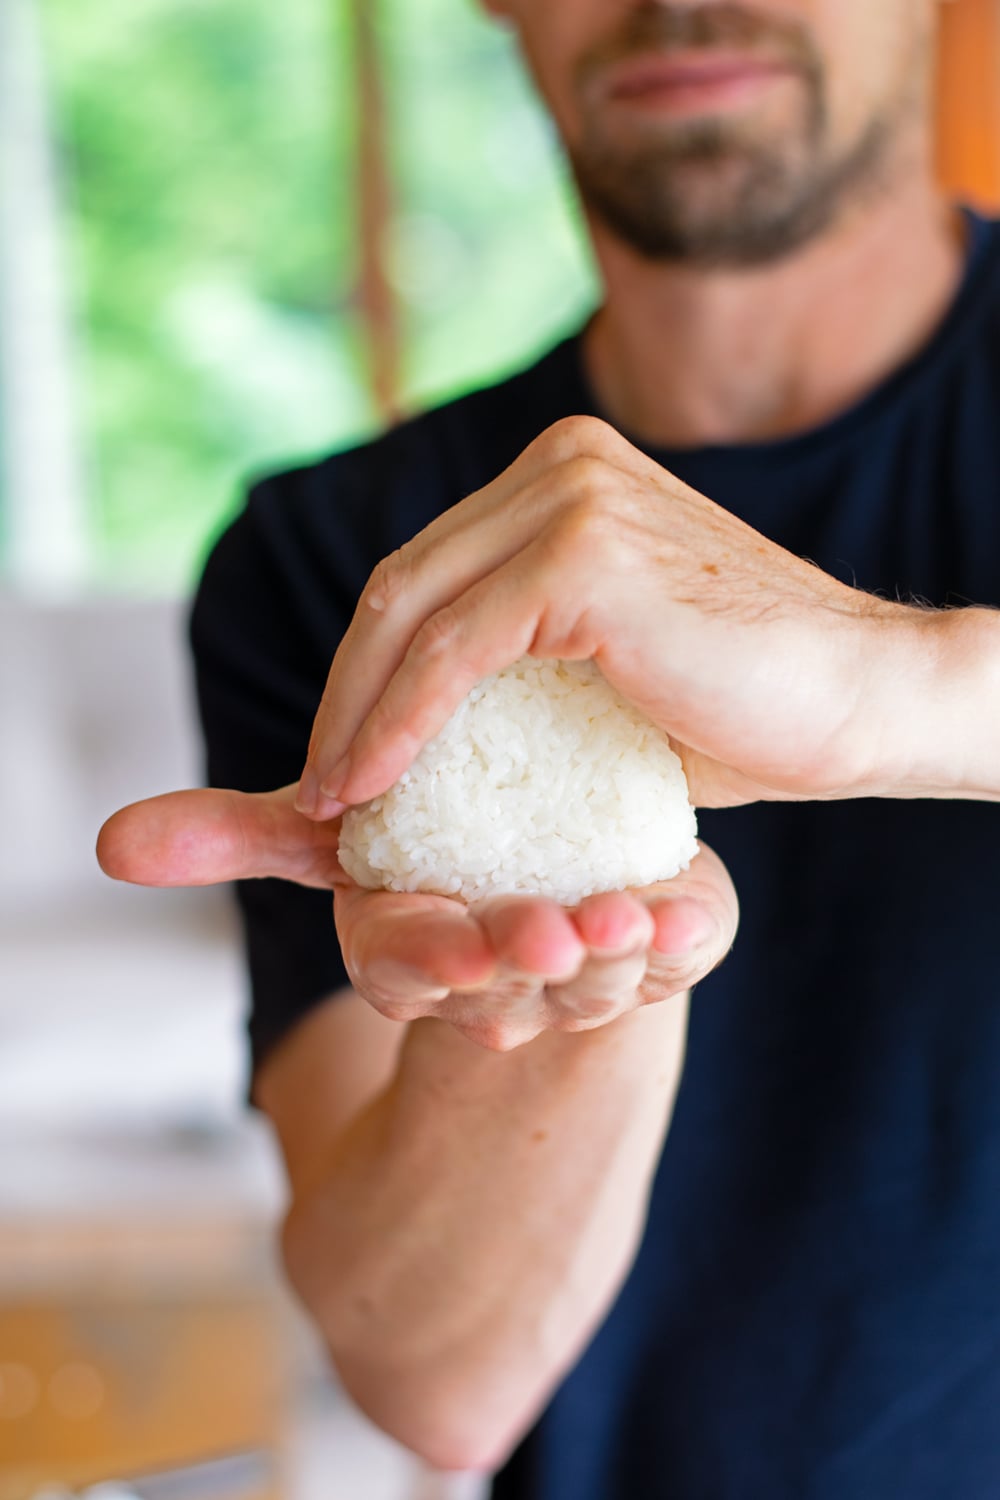
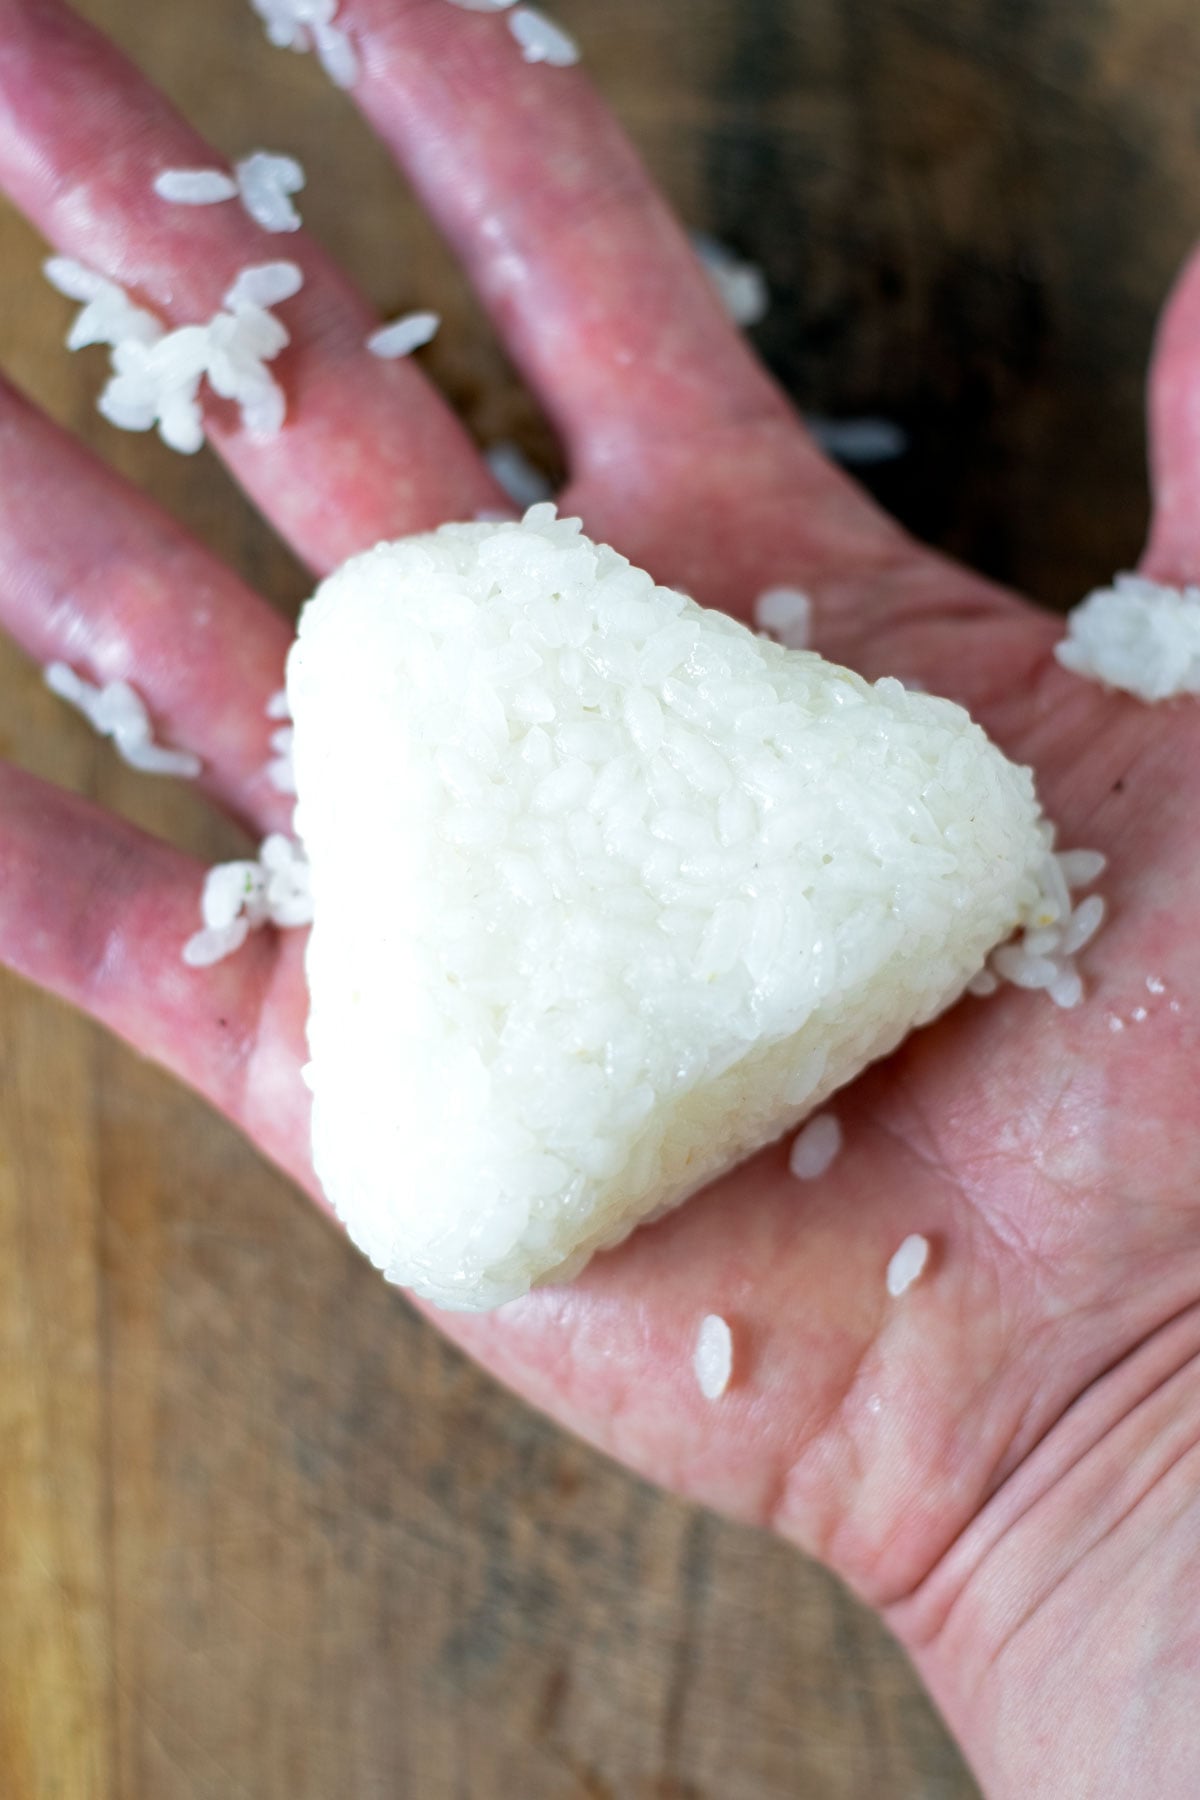
How to Shape Onigiri by Hand (Step-by-Step)
Making onigiri by hand is easier than it looks. With a little practice, you’ll be able to shape soft rice balls that hold together without crushing the grains.
The key is to press the rice gently so it forms a shape while staying light and fluffy. Think of shaping the rice rather than squeezing it.
Follow these simple steps.
Step 1: Wet your hands
Dip your hands into a bowl of water and shake off the excess. This prevents the rice from sticking to your palms.
Step 2: Add a pinch of salt
Lightly dip your fingers into a small dish of salt and rub it over your palms. This seasons the outside of the rice and is the traditional way onigiri are made in Japan.
Step 3: Make a rice ball
Scoop a handful of warm rice into your hands and gently shape it into a loose ball, similar to a soft snowball.
The rice should hold together easily, but the grains should still look fluffy rather than tightly packed.
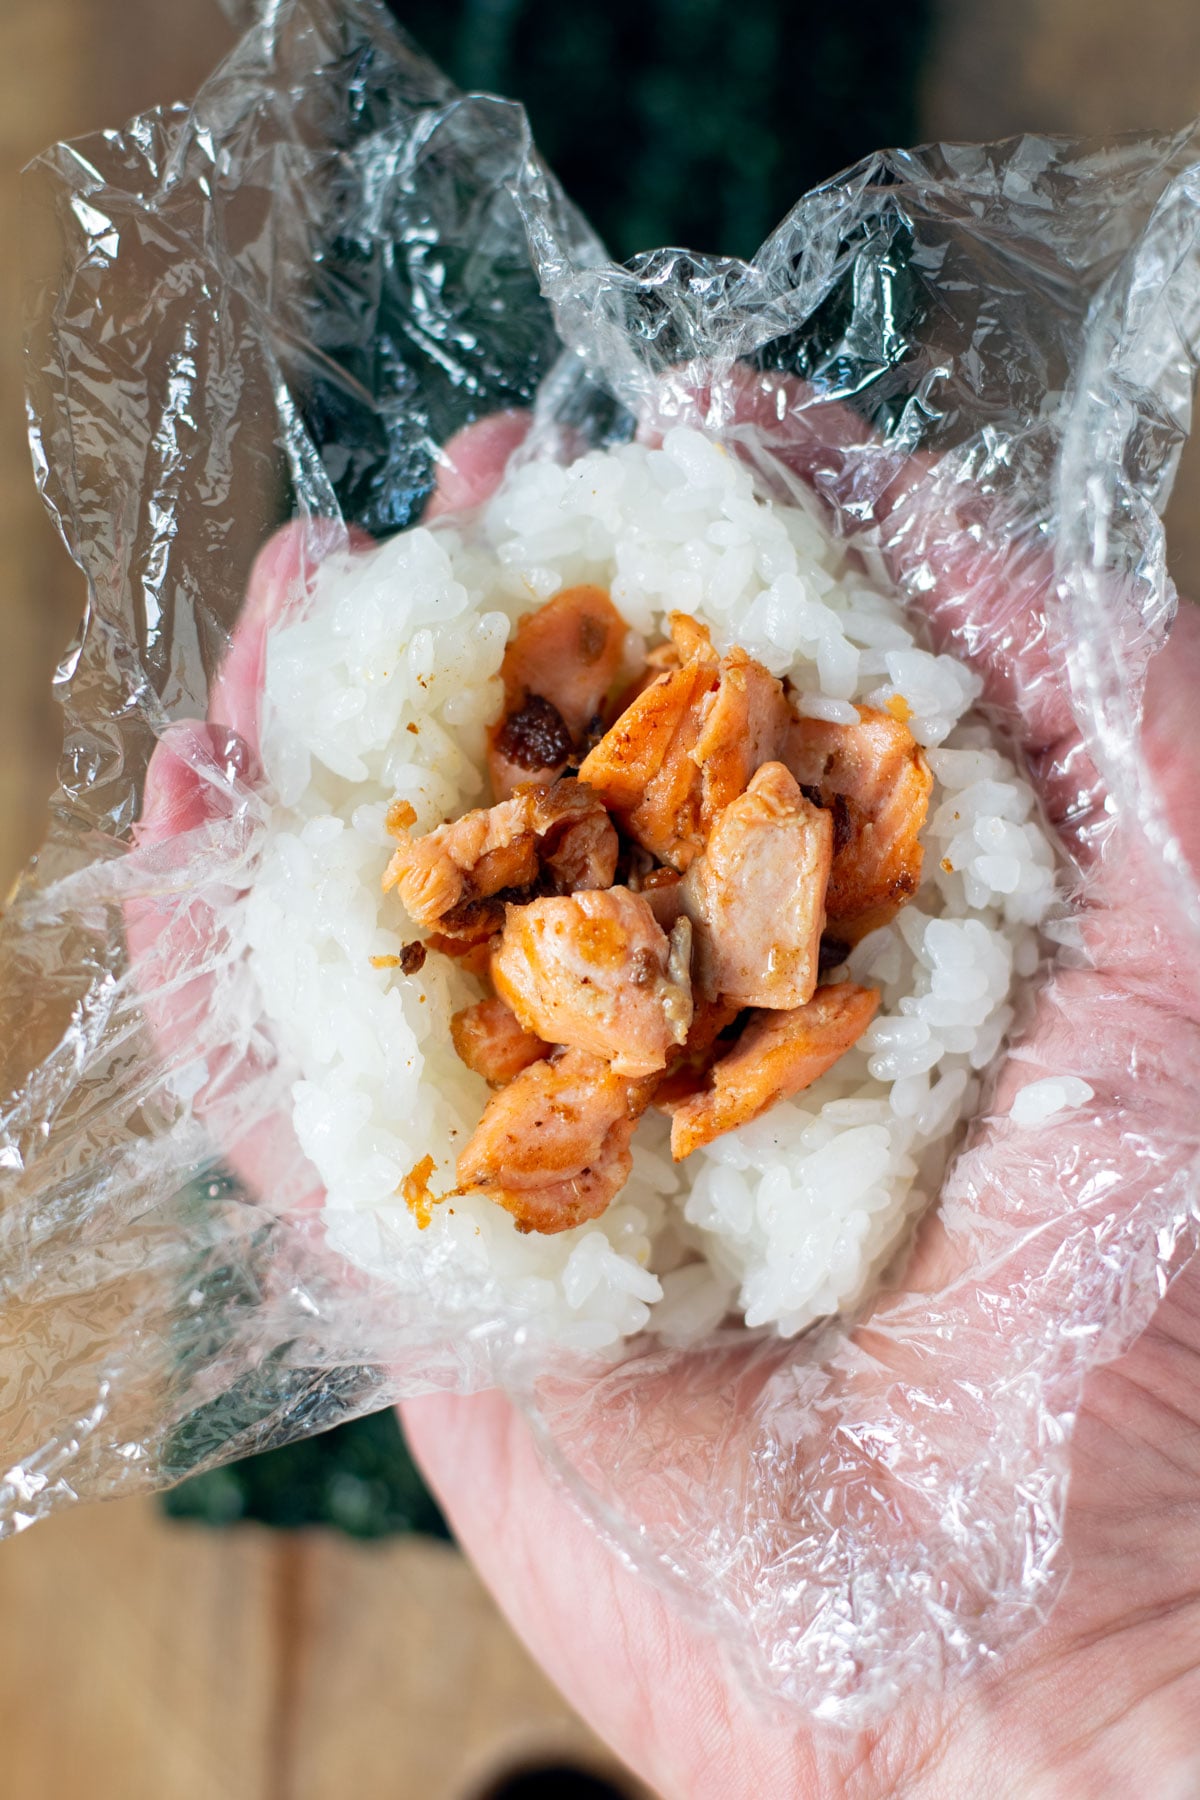
Step 4: Add filling (optional)
If you're making filled onigiri, press a small indentation into the center of the rice ball and add your filling. Then gently fold the rice around the filling so it is sealed inside.
If you're new to making onigiri, you may want to practice with plain rice first. You can also start with my Easy Onigiri Recipe to learn the basic technique.
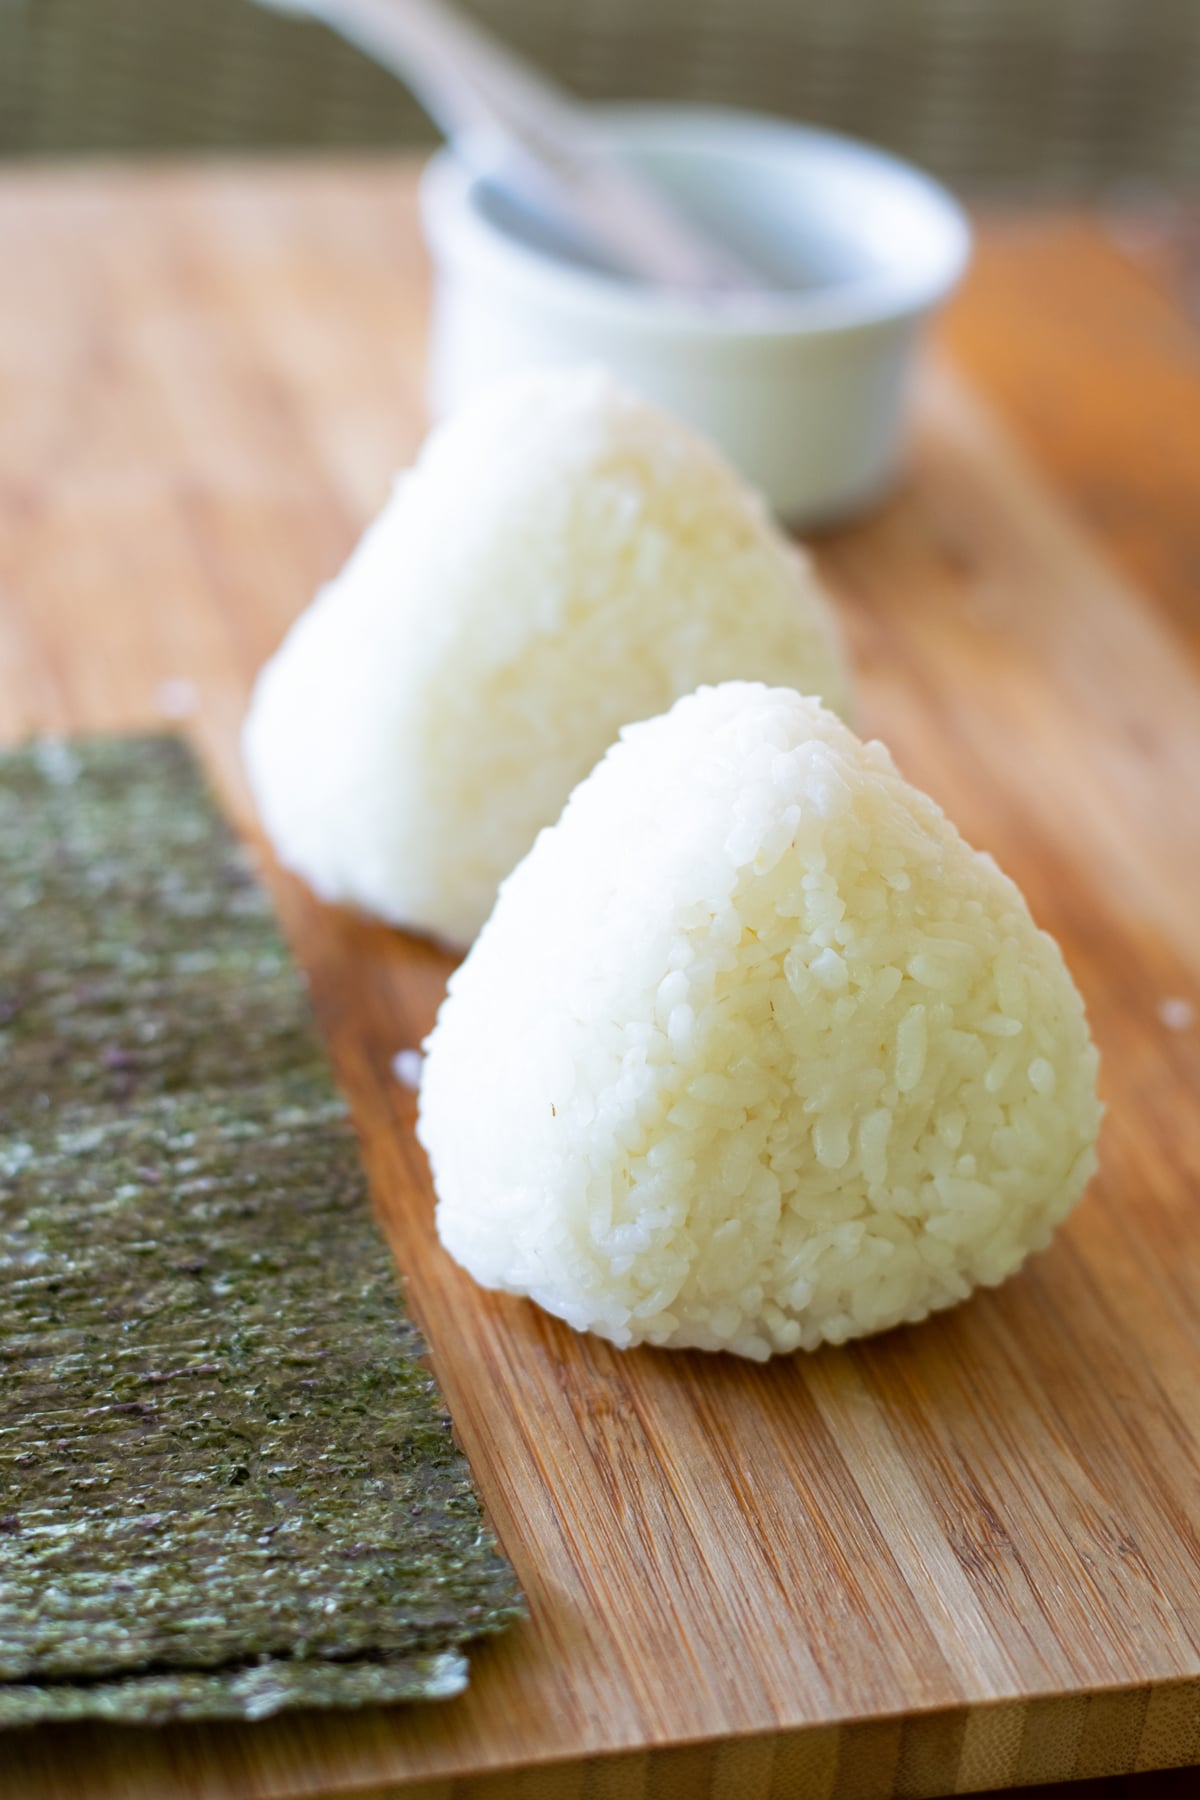
Step 5: Form the triangle
Place the rice ball in the palm of your non-dominant hand and curve your palm slightly to support it. This hand forms the base of the triangle.
With your other hand, gently press from the top while keeping your hand in a loose V-shape. The V-shape creates the first corner of the triangle.
Step 6: Rotate and shape
Rotate the rice about 90 degrees and press again to form another side. Continue rotating and pressing lightly until a neat triangle forms.
Try to keep a gentle rhythm, pressing lightly after each rotation.
Important tip:
Avoid squeezing the rice too tightly. Press just enough so the grains hold together while remaining soft and fluffy.
You’ll know it’s right if the onigiri feels:
- light and tender, not dense or compact
- gently shaped with three soft corners
- stable enough to stand upright
How to Wrap Onigiri in Nori
Wrapping onigiri with nori is simple, but a few small details make a big difference. The goal is to make the rice ball easy to hold while getting the texture you prefer.
In Japan, onigiri can be wrapped in different ways depending on when you plan to eat it and whether you like the nori crisp or soft.
The main difference between these methods is when the nori comes into contact with the rice, which affects its texture.
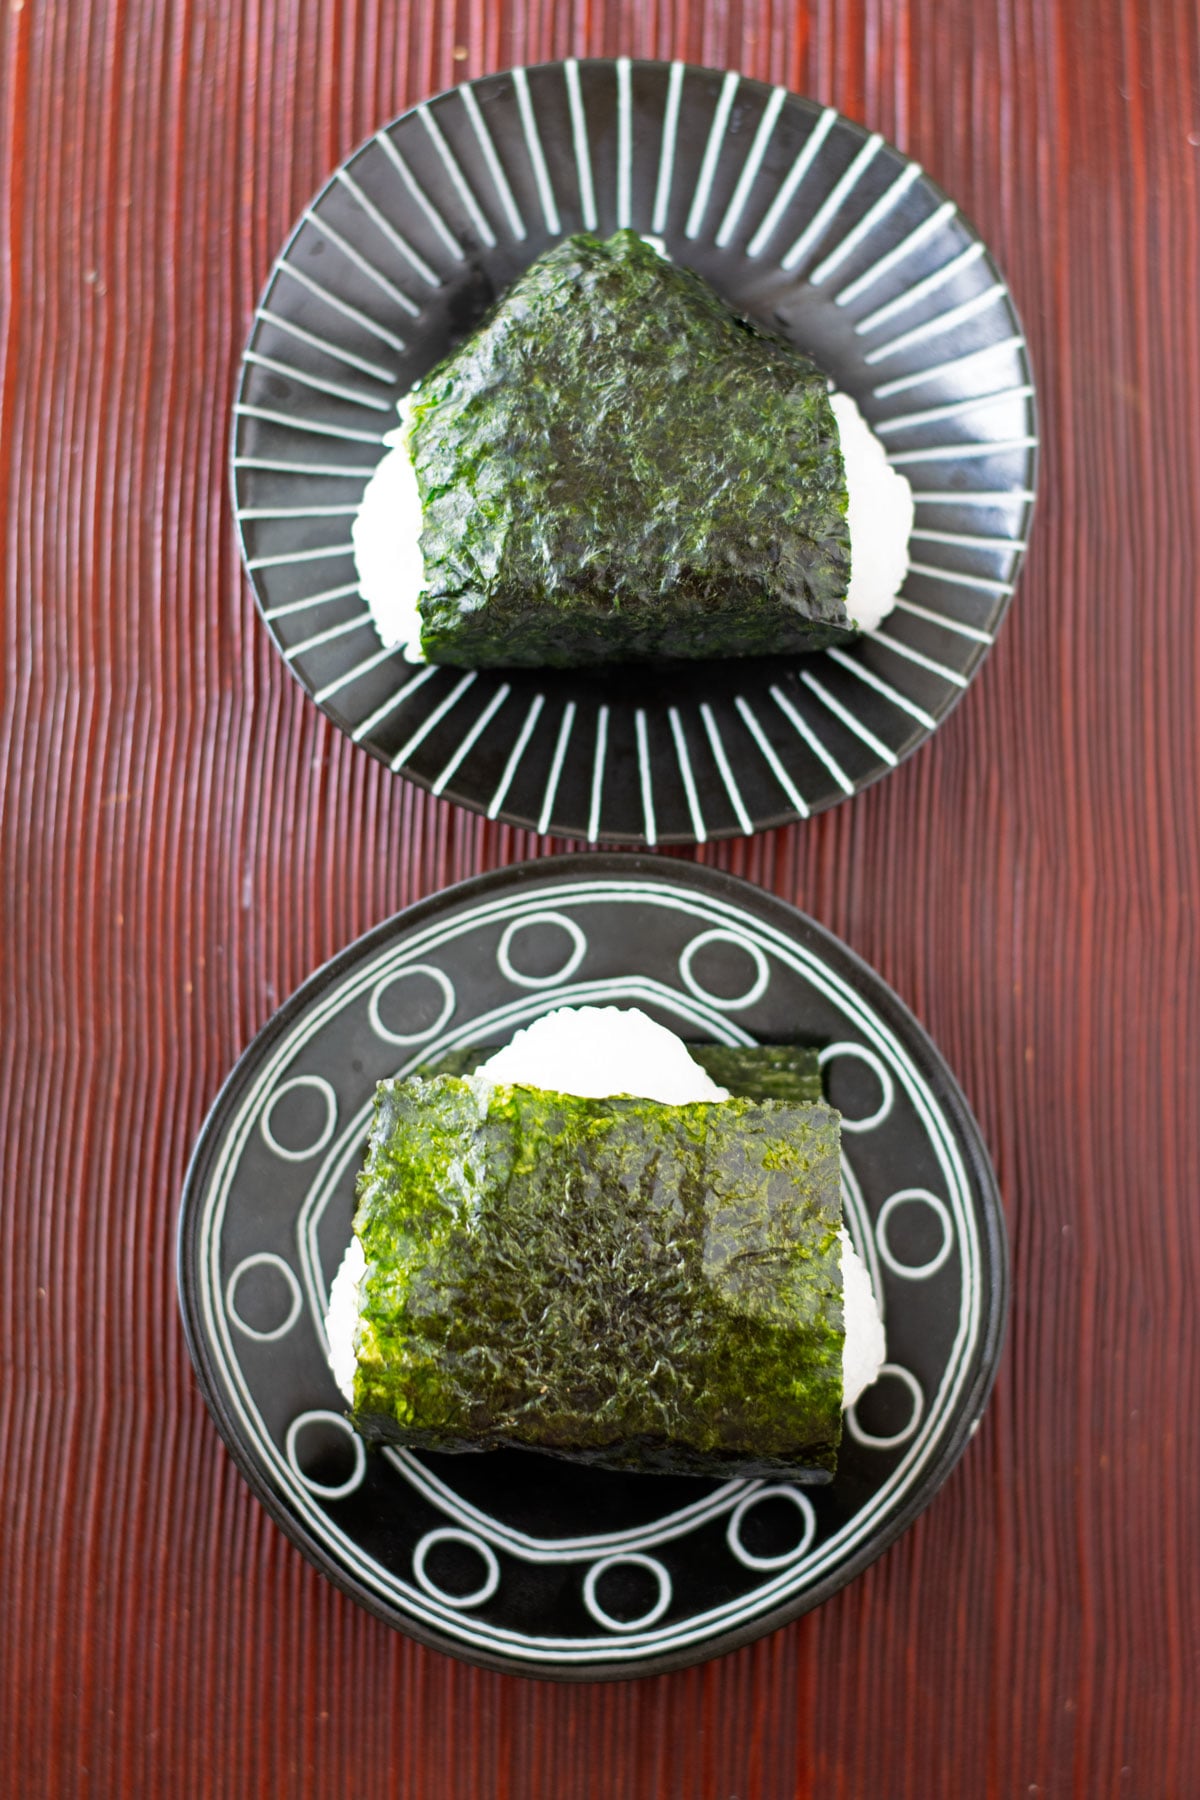
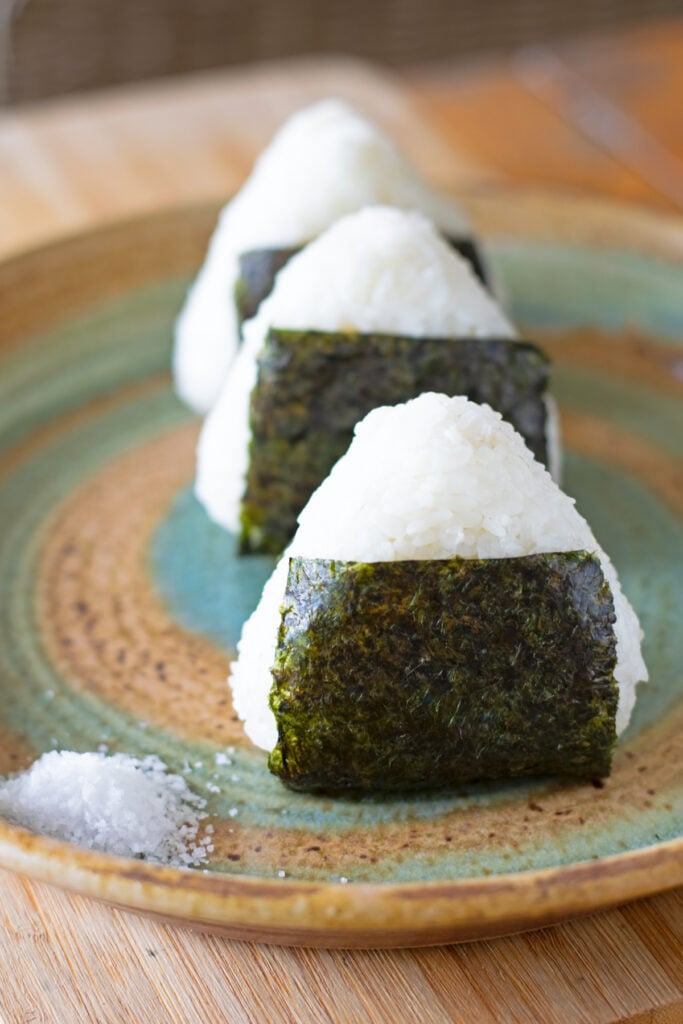
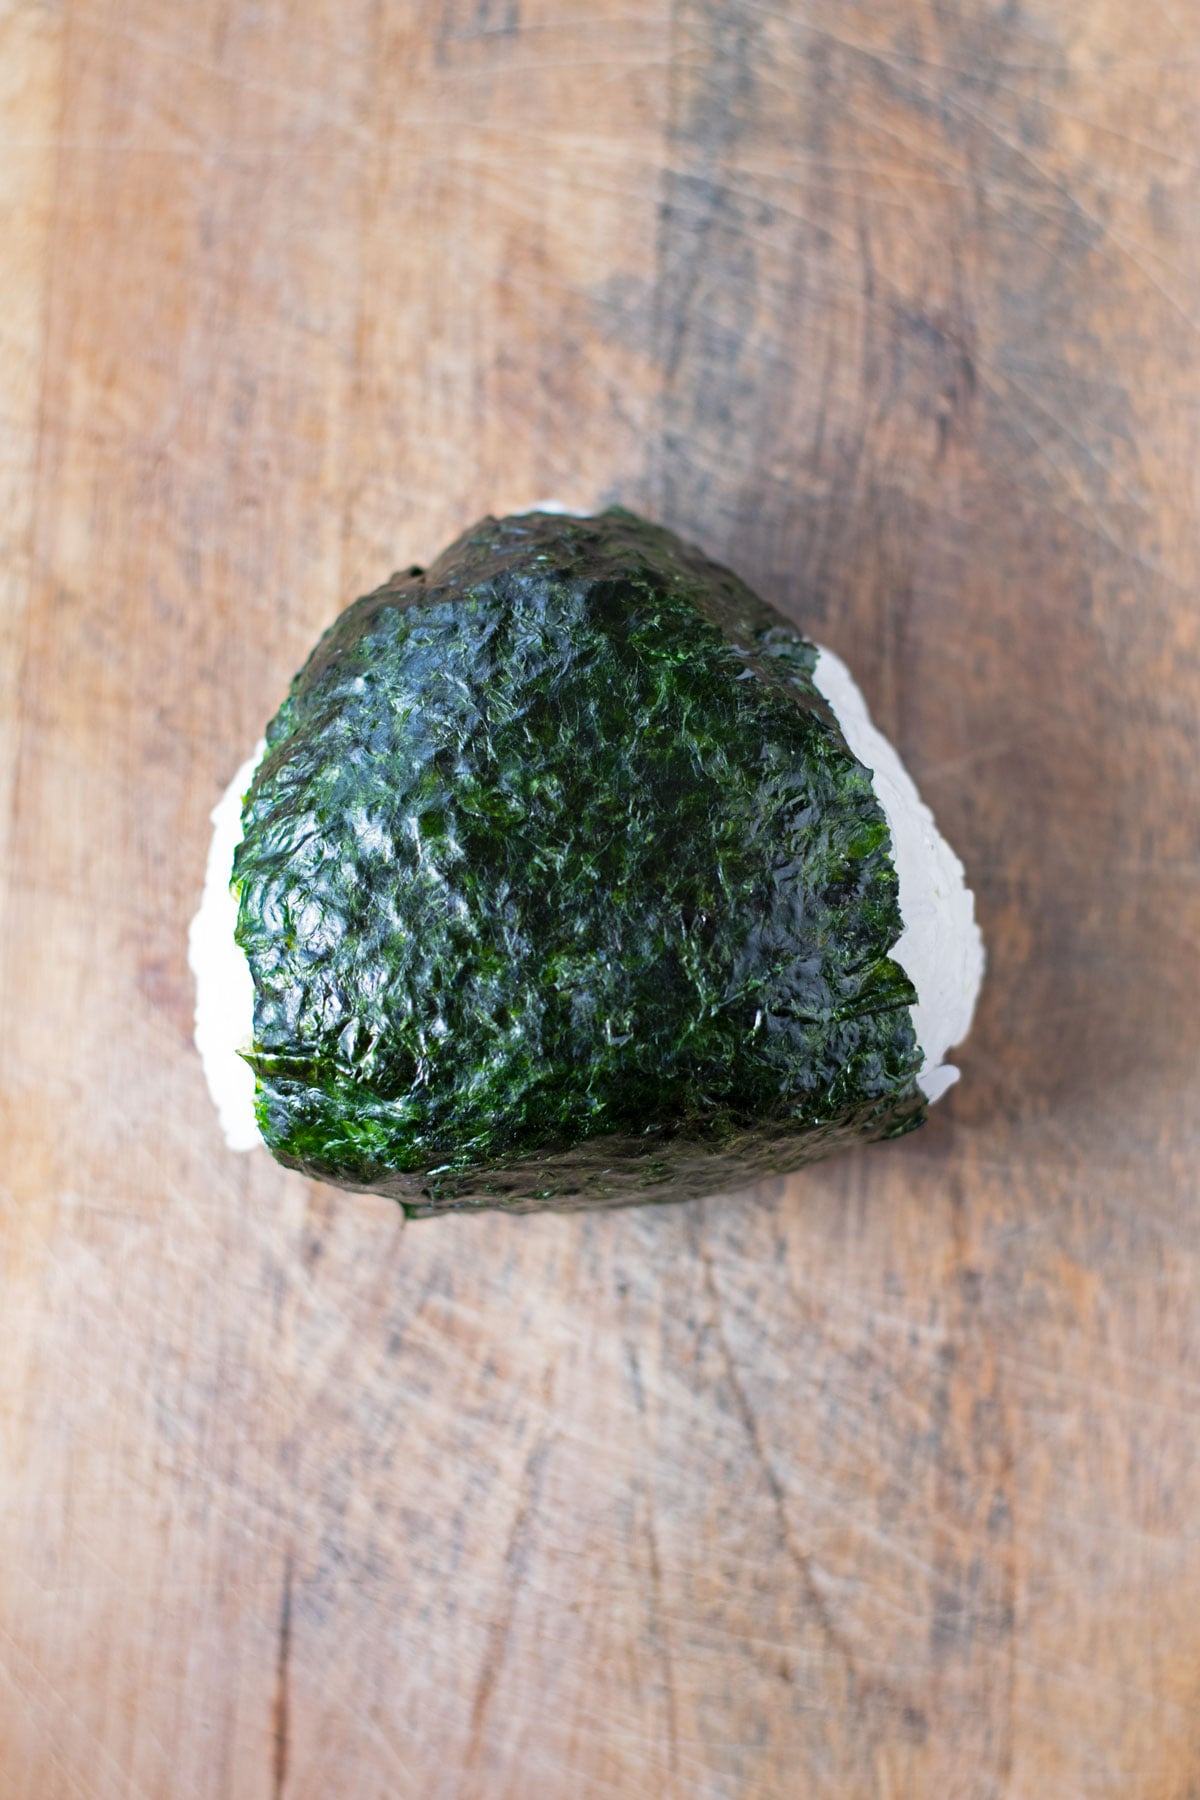
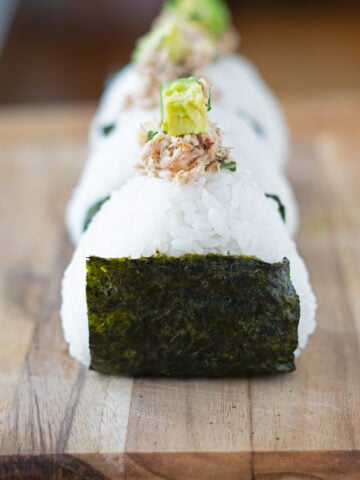
Method 1: Nori Wrapped Around the Bottom (Most Common)
A simple wrap that’s easy to hold and great for beginners.
This is the most common homemade method. A strip of nori wraps around the bottom so you can hold the onigiri without your hands sticking to the rice.
Steps:
- Cut the nori into strips (about ⅓ of a sheet)
- Let the onigiri cool slightly (warm, not steaming hot)
- Place the nori under the bottom edge (shiny side out)
- Fold the sides up and press gently
Serve right away for the best texture.
Pro Tip: If you want a more balanced look, trim the nori into a slightly shorter strip so it wraps evenly up both sides of the onigiri. This creates a more symmetrical shape, but it’s optional.
Common Variations (Method 1)
There are a few ways to wrap nori around the outside of onigiri. These are simple variations of the same technique.
- Bottom wrap (most common): A strip wraps around the base for easy holding
- Side wrap: A wider strip wraps around the sides of the triangle
- Side-to-top wrap: Nori wraps from the bottom and slightly over the top
All of these styles are commonly used in Japan, and the choice mostly comes down to preference.
Method 2: Wrap Just Before Eating (Crispy Nori)
Best for lunchboxes or later. Keeps the nori crisp.
This method is ideal if you’re packing onigiri or not eating them right away. Instead of wrapping immediately, keep the nori separate and add it just before eating.
Nori absorbs moisture quickly, so it softens if it sits against the rice too long.
Steps:
- Let the onigiri cool slightly
- Store the nori separately in a dry container
- Wrap just before eating
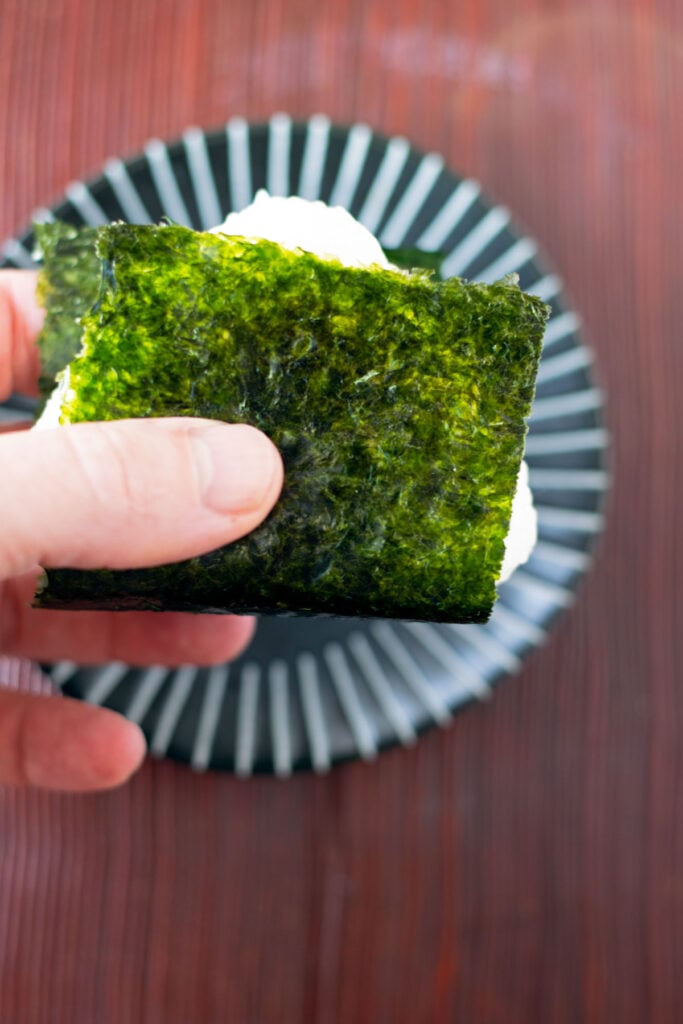
Pro tip: Wrap the rice in plastic wrap and pack the nori separately for lunchboxes.
This is the same idea used in Japanese convenience stores, where special packaging keeps the nori crisp until the moment you open it.
Method 3: Fully Wrapped Onigiri (Soft Nori)
A traditional home-style wrap where the nori softens and blends with the rice.
In many Japanese homes, onigiri are wrapped completely in nori and allowed to soften.
Steps:
- Wrap the entire rice ball with a piece of nori large enough to cover it completely (about one-third of a sheet, depending on size)
- Fold the nori over the top, overlapping slightly so it wraps around the rice ball
- Press gently so it sticks
- Let it sit for a few minutes before eating
Pro Tip: If the nori doesn’t stick, lightly wet your fingertips and press the edges gently to seal it.
Quick Comparison
- Bottom wrap: Easy to hold, slightly crisp
- Wrap before eating: Crispiest texture
- Full wrap: Soft, traditional texture
Crisp vs Soft Nori (Which is Better?)
In Japan, both styles are enjoyed.
Crispy nori is popular in convenience store onigiri
Soft nori is more common in homemade onigiri
Neither is better. It simply depends on your preference.
How to Wrap Onigiri with Plastic Wrap
Using plastic wrap is one of the easiest ways to shape onigiri, especially for beginners or when packing lunchboxes. It keeps your hands clean and helps the rice hold its shape without sticking.
Steps:
- Place rice on plastic wrap
Set a scoop of warm rice in the center of a sheet of plastic wrap. - Add filling (optional)
Make a small indentation in the rice and add your filling. - Gather the wrap
Lift the edges of the plastic wrap around the rice to enclose it. - Shape gently
Use your hands to press and rotate the rice into a triangle or round ball. Apply light, even pressure so the rice holds together without becoming dense. - Remove or store
Remove the plastic wrap before adding nori, or keep the onigiri wrapped if storing for later.
Pro Tip: Plastic wrap is especially helpful if you find the rice too hot to handle or want evenly shaped onigiri.
If you’re uncomfortable shaping onigiri with your hands, plastic wrap is also a practical option. In Japan, cooks typically wet and salt their hands before shaping, which helps keep the rice clean, but plastic wrap offers a simple alternative.
Plastic wrap helps prevent sticking and makes it easy to shape onigiri without handling the rice directly.
Onigiri Without Nori
Not all onigiri are wrapped in nori (seaweed). In Japan, many rice balls are enjoyed without nori, especially simple homemade onigiri.
In these styles, the rice itself often takes center stage, whether through seasoning, mixing, or grilling.
Common examples include:
- Shio onigiri: Lightly salted rice balls
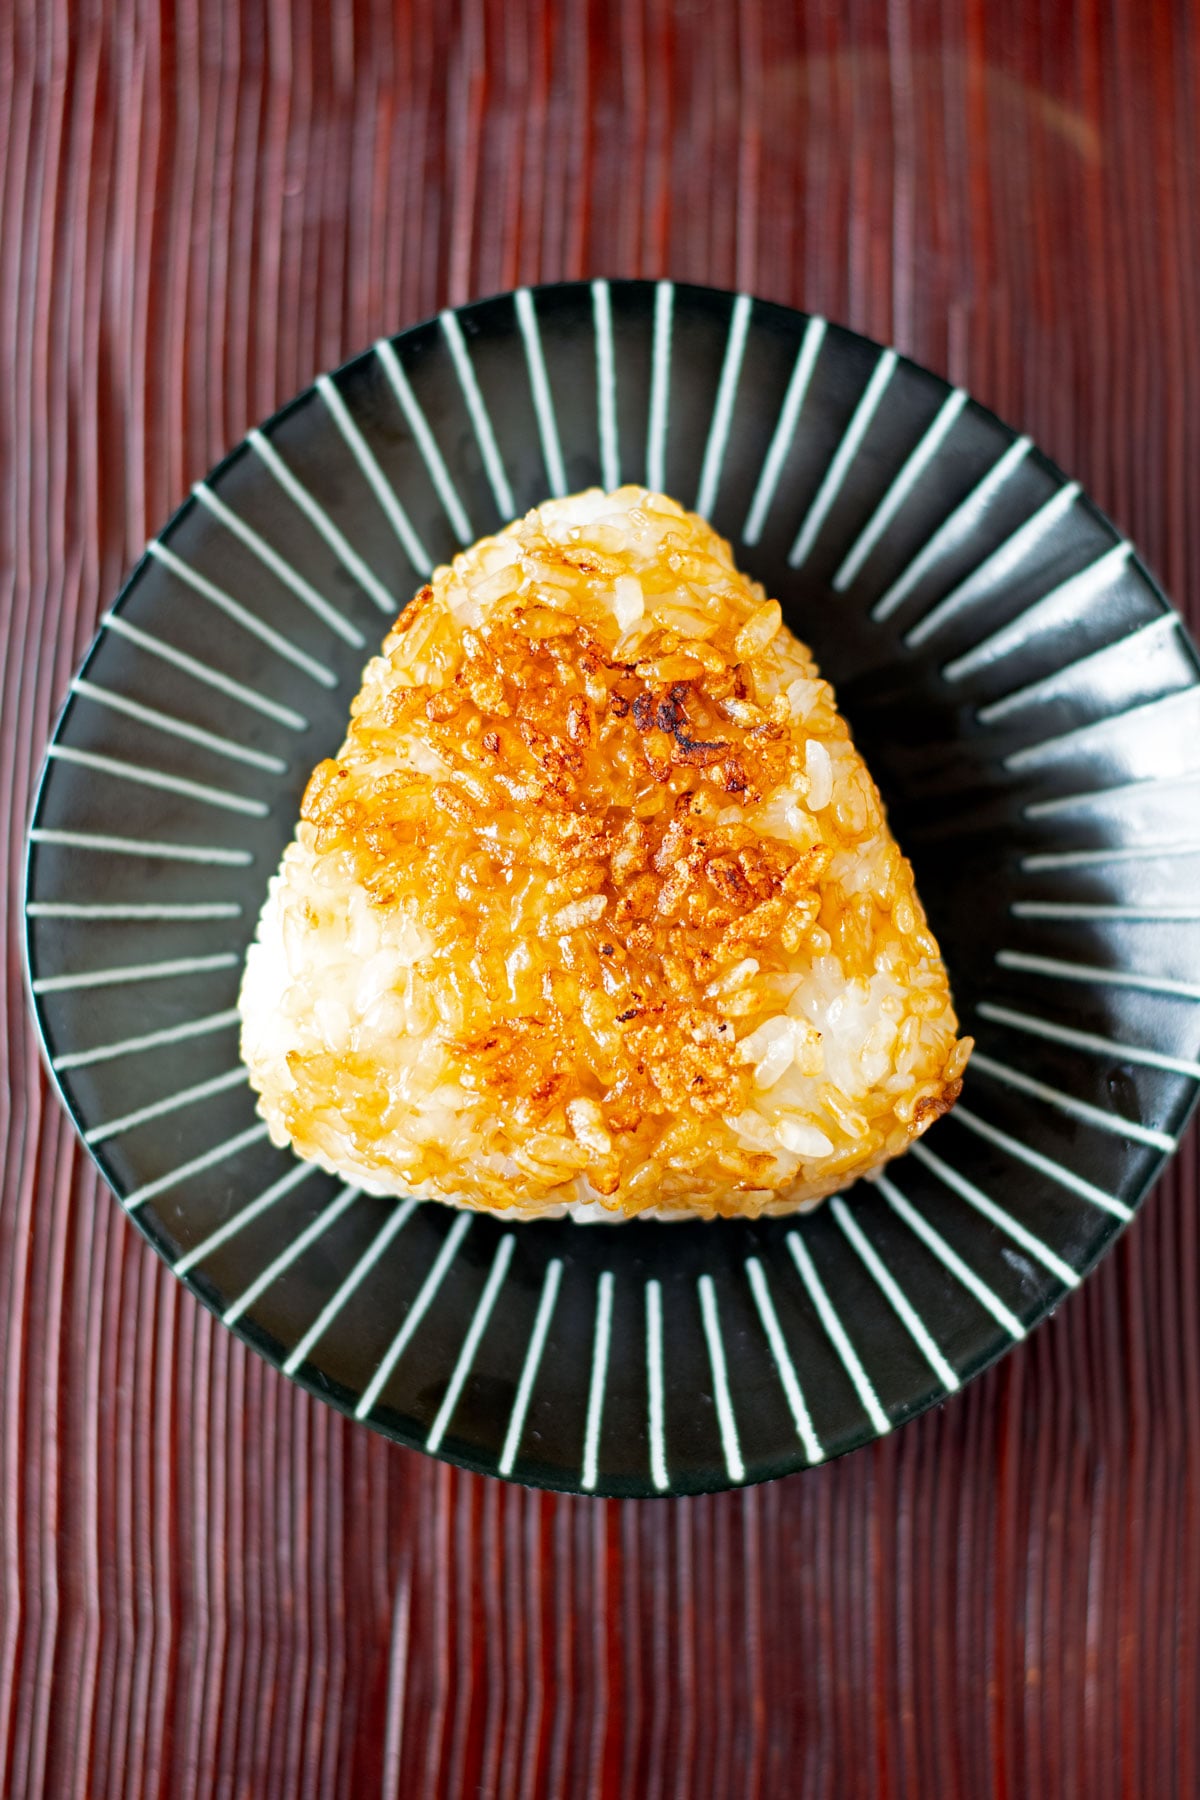
- Yakionigiri: Grilled rice balls with a crisp exterior
- Mazegohan onigiri: Rice mixed with ingredients
- Furikake onigiri: Rice seasoned with furikake (Japanese rice seasoning)
- Onigiri wrapped with shiso leaves or white kombu
How to Make Onigiri Without Nori
Steps:
- Shape the rice
Form the rice ball by hand or with plastic wrap. - Press gently
Use light pressure so the grains hold together while staying soft and fluffy. - Serve or store
Eat as is, or wrap lightly if packing in a lunchbox.
In Japan, simple shio onigiri is often seen as one of the best ways to appreciate good rice. It’s simple, but when the rice is good, it’s enough.
While it’s commonly served with nori, it’s also sometimes enjoyed without it, especially when the focus is on the rice itself. Without nori, the texture, aroma, and natural sweetness of freshly cooked Japanese rice stand out more clearly.
This is especially noticeable when using high-quality short-grain rice, where the flavor and texture are the main experience.

How to Keep Nori from Getting Soggy
Nori absorbs moisture quickly, so it softens when it comes into contact with warm rice and even from humidity in the air. The key is to reduce steam and keep the nori dry until the last moment.
Tips:
- Let the rice cool slightly before wrapping so excess steam can escape
- Avoid sealing hot onigiri in plastic wrap or containers, which trap moisture
- Add nori just before eating whenever possible
- Pack nori separately if bringing onigiri in a lunchbox
- Keep nori in its original packaging or an airtight container, and only open it when you’re ready to use it
Pro Tip: Nori can be stored in the refrigerator to help maintain its crisp texture, but keep it well sealed to prevent moisture from getting in.
This is the same idea used by Japanese convenience stores to keep nori crisp until the moment you open it.
How to Store Onigiri
Onigiri are best eaten the same day, when the rice is still soft and fresh.
Helpful tips:
- Wrap tightly to prevent the rice from drying out
- Store at room temperature if eating within a few hours
- Avoid refrigeration, which makes the rice firm and dry
- If storing overnight, wrap well and reheat gently before eating
Pro Tip: If the rice becomes firm, a quick reheat in the microwave can help restore its soft texture.
Common Mistakes When Wrapping Onigiri
Onigiri are simple to make, but a few small mistakes can affect the texture and shape. Here are some of the most common ones.
Using the wrong type of rice
Onigiri should be made with Japanese short-grain rice, which has the natural stickiness needed to hold its shape. Long-grain rice doesn’t bind well and can cause the rice ball to fall apart.
Shaping rice that is too hot
Fresh rice should cool slightly before shaping. If it’s still steaming hot, it’s difficult to handle and may not hold together properly.
Pressing the rice too tightly
Onigiri should be gently shaped, not compressed. Press just enough so the grains hold together. Squeezing too hard removes the air between the grains and creates a dense texture.
Wrapping nori too early
Nori absorbs moisture quickly. If it sits against the rice too long, it becomes soft. For the best texture, wrap the nori just before eating.
Adding too much filling
Too much filling can cause the rice ball to split or lose its shape. A small amount in the center is usually enough.
Using dry hands when shaping
Rice sticks easily to dry hands. Lightly wetting and salting your hands helps prevent sticking and gently seasons the rice at the same time.
Cultural tip:
In Japan, cooks often say the best onigiri are made with “gentle hands.” The goal is to shape the rice just enough so it holds together while keeping the grains light and fluffy.
FAQs
Place a strip of roasted nori along the bottom or sides of the rice ball and gently press so it sticks. The rough side should touch the rice, with the shiny side facing out. For the best texture, wrap the nori just before eating so it stays crisp.
Yes, you can use plastic wrap to shape onigiri. It prevents sticking, keeps your hands clean, and makes shaping easier. It’s also useful for packing onigiri in lunchboxes. If using nori, remove the wrap and add the nori just before eating.
Wet your hands lightly and rub them with a small pinch of salt. Place warm rice in your palm and gently press while rotating it to form a triangle or ball. Use light pressure so the rice holds together without becoming dense.
Use Japanese short-grain rice. It has the natural stickiness needed for shaping. Long-grain rice, such as jasmine or basmati, does not bind well and can cause the rice ball to fall apart.
Use freshly cooked Japanese short-grain rice and shape it while it’s still warm, but not steaming hot. Wet and lightly salt your hands, and press the rice gently so it holds together without crushing the grains.
It depends on the texture you prefer.
For crisp nori, wrap it just before eating or keep it separate when packing.
For soft nori, you can wrap it in advance and let it absorb moisture from the rice, which is common in homemade onigiri.
More Onigiri Recipes and Ingredient Guides
Once you know how to wrap onigiri, here are a few recipes and guides to try next.


Leave a Reply